How to create a Creative Calendar for kids 🎨 | DIY activity with markers
The new year is just beginning and what better way to engage the kids than with a fun and creative activity? If you're looking for a simple and colorful idea to spend time together, why not create a beautiful personalized calendar? Don't worry, it's easier than it looks! With a few simple materials and Toy Color markers, you can make a calendar that your kids will love to use all year long.
Here's how to do it! 🖍️✨
🎨 What Do You Need?
- Toy Color Markers : perfect for coloring in a bright and safe way.
- Toy Color vinyl glue : to glue everything easily.
- White and colored cardboard : to create the base of the calendar.
- Ruler : for drawing straight, precise lines.
- Pencil : for making light marks before tracing.
- Scissors : For cutting out shapes and boxes.
- Wooden clothespins : to add a final decorative touch!
🗓️ Steps to Create Your Calendar
1. Draw the Boxes: Start by taking the white construction paper and using the ruler to draw identical boxes. Each box will represent a day of the month, so make sure you have enough space to write numbers and days of the week.
2. Color the Boxes: Use Toy Color markers to color each box. You can choose a different color for each month, or keep the same color scheme throughout the year. Have fun and stimulate your child's creativity!
3. Write the Information: Now, write the name of each month, the numbers from 1 to 31, the days of the week and the seasons. You can do it in beautiful handwriting or use stickers to make it even more special.
4. Cut Out the Boxes: Carefully use scissors to cut out the boxes along the lines you drew. Each box will be a small piece of your calendar that will join together to form the entire month.
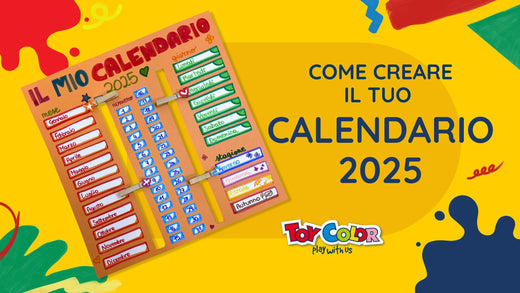
5. Personalize the Cover: Take a colored card and write in large letters “MY CALENDAR 2025”. You could also add drawings, stars or funny figures that you like.
6. Glue the Boxes to the Cardstock: Using vinyl glue, glue the boxes onto the colored cardstock, one under the other, forming columns for each month. Make sure to leave a little space between each box to create a neat effect.
7. Cut Out the Blank Spaces: Using scissors, cut out the blank spaces between the columns of boxes. This will make the calendar look even cleaner and more professional.
8. Decorate with Wooden Clothespins: Finally, take the wooden clothespins and use them to add a decorative touch. You can paint them with Toy Color markers or leave them natural, gluing them to the edge of the calendar or in strategic points to give an even more creative look.
9. Your Calendar is Ready! That's it! Your personalized calendar is now ready to hang in your home and use to keep track of the days. Each month will be an opportunity to add new colors and decorations together with your child!
❤️ Did You Like This Article?
If you enjoyed this tutorial, leave us a like and don't forget to subscribe to our YouTube channel to discover more creative ideas like this one! Every week you'll find new fun ideas to stimulate your children's imagination.
👉🏻 Subscribe to our YouTube channel Toy Color!
🎨 Learn More About Toy Color and Kreable Colors
If you want to find out more about our creative products such as Toy Color markers and Kreable pencils, visit our website and discover the quality of Italian colors!
👉🏻 Visit toycolor .it and discover the Italian color factory !
Creating a personalized calendar together is not only a way to decorate your home, but also an opportunity to teach children to plan and organize their time in a creative and fun way. Good luck and have fun! 🎉


